Importing large datasets in Power Platform can be frustratingly slow, especially during supposedly one-time migrations for which you don’t want to license or use a paid integration platform. In one of my projects, constant changes to the data model turned a seemingly simple import of data from a legacy system into a days-long headache.
Quite a few times, we had to delete the data we had in our testing environment and start a new import. With more than 100,000 records (a comparatively small number for a legacy system), this still took a few hours each time. We had a cycle of “here’s a problem” – “alright, please check tomorrow”, frustrating both the team testing for data quality and myself.
The recently introduced Bulk Messages “Create Multiple”, “Update Multiple”, “Upsert Multiple” and “Delete Multiple” (preview) can offer a large boost for just a bit of setup work, enabling quick changes or migrations and accelerated the process tremendously.
Benchmarks
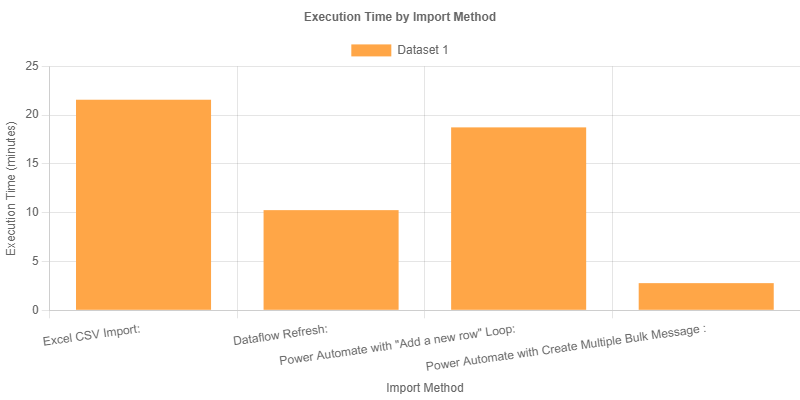
For comparison, I imported 10000 contacts with the fields “First Name”, “Last Name”, “Job Title”, “Email”, “Business Phone”, “Gender” and “Birthday”. The dataset used was a sample people dataset from Datablist. I ran each import method three times to calculate an average time:
- Excel CSV Import: 21:35 minutes
- Dataflow Refresh: 10:16 minutes
- Power Automate with “Add a new row” Loop: 18:45 minutes (loop execution took 17:04 minutes)
- Power Automate with Create Multiple Bulk Message : 2:47 minutes (import time: 1:47, nearly 100 records per second!)
Adding lookup and choice fields increased the import time by about 30% for all methods.
Using Bulk Messages
When using Bulk Messages, there’s four primary steps you’ll need to execute, which can be wrapped in a Power App on demand trigger:
- Retrieve your source data
In our example, this is done using the “List rows present in a table” action with the Excel connector, using an xlsx file saved in OneDrive, but it can be any kind of action which results in you having your data in the flow.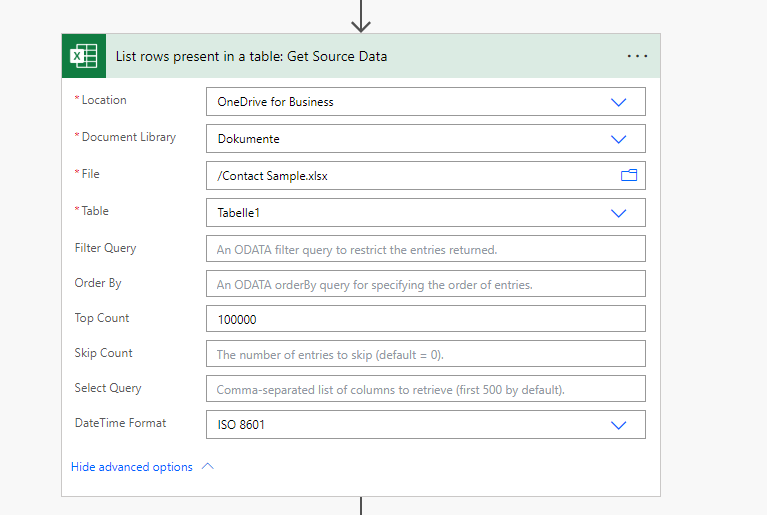
- Format the data
If the data is already available as an array and you only need to map to the right column names, this is a simple “Select” step. For each field you want to fill in your record, you’ll need to map the logical name of the field to your source data. However, there are some special cases:
- Date Fields
To import dates, use theformatDateTimeexpression like this:formatDateTime(item()?['Date of birth'], 'yyyy-MM-dd') - Choice Fields
You’ll need to set choice fields using the numerical Option Set Value (In our example I’m just setting gendercode to 1, which is the code for male). These values can be seen through the maker portal, or with the great Level up for Dynamics 365/Power Apps browser add in. - Lookup Fields
To connect to other records, your formatted data needs to use OData Binding notation. For a detailed overview of OData Binding notation, check out Syed Sajid Hussain’s blog post.
In our example, I’m using a fixed GUID, but it could also be a value from the source data or an alternate key. - OData.type
For every record which is to be imported, you’ll need to add the “@odata.type” property, with a value of “Microsoft.Dynamics.CRM.[entitylogicalname]”. In our example, this is going to be “Microsoft.Dynamics.CRM.contact”. As you can see in the screenshot below, to add the property with the select step, we need to repeat the “@”, so Power Automate does not confuse the string with an attempt to create an expression.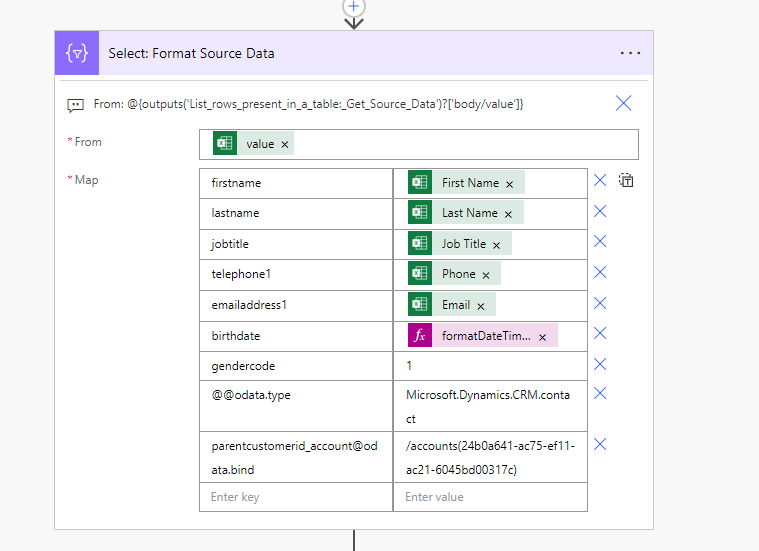
- Date Fields
- Chunk the Data
To avoid message size and time limits large inputs need to be chunked and imported separately.
There’s a trade-off between large chunks leading to shorter import times, but increasing the chance that your import is going to fail because of those limits. Microsoft recommends 100-1000 records per message, depending on size of records and any plugins which may run during the import.
To find the sweet spot, I recommend setting the chunk length in a separate variable and experimenting with the most complicated subset of your import data. Don’t forget to have a margin of error, as the API and your environment does not have a fixed throughput.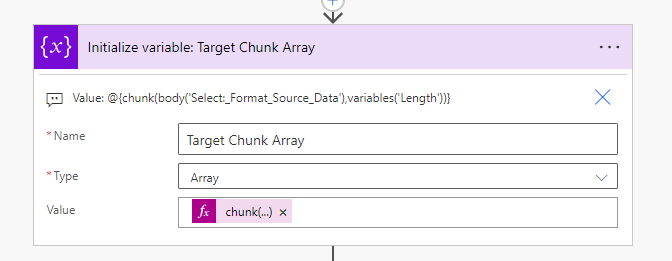
- Import Data
After chunking, only the import is left. For that, an apply to each loop over our chunked data is used, containing only the “Invoke an HTTP request” with the preauthorized Entra ID connector.
The request can be set as seen below, please note that the entity set name needs to be a part of the url of the request.
The loop itself can be run in parallel as well to further speed up the process. I’ve used a concurrency level of 4 to keep to the Service protection limit of 20 minutes execution time per 5 minute sliding window.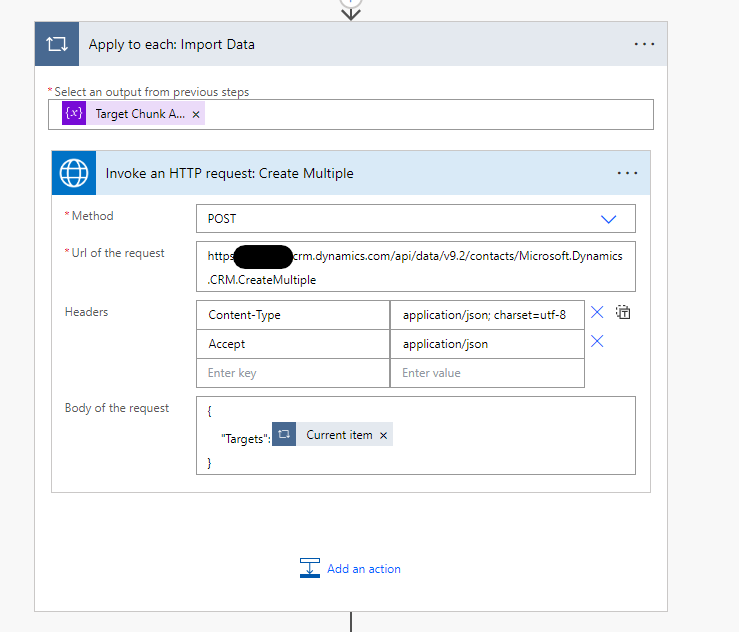
Issues and Pitfalls
There are of course a few limits when using the Bulk Messages. If you suspect your use case may run into those, please look at the official documentation for further details.
- Any error during the call of a Bulk Message leads to the rollback of the entire changeset.
Only use Bulk Messages if you are sure your data is going to be formatted correctly and any lookup values you are setting are available in your target system. - Not all tables are available for Bulk Messages
You can check if your use case is supported using a GET call described here - Message size and time limits
Any single request may not exceed 116.85 MB or an execution time limit of 2 minutes. - API Limits
Using Bulk Messages instead of single action should lead to avoiding the “6000 requests per 5 minutes” limit, as each message is only a single request containing hundreds of records. However, according to documentation, each record included in the Target parameter of the message accrues to the Power Platform Request limit.
Depending on your licenses, this may not be an issue for your use case but if you encounter problems, possible solutions include- Changing the HTTP Request from a licensed user to a non-licensed user, which have request limits that are pooled at tenant level
- Purchase additional licenses, e.g. a Power Automate per flow pla
- Purchase a Power Platform Request capacity add-on
- Update and Upsert Multiple have different behaviours even when only updating records
I have not tried this myself, but according to documentation Update Multiple messages can not use alternate keys and ignore duplicate record in the payload, while Upsert Multiple can use alternate keys and fail when a duplicate is found in the payload. - Error handling and monitoring
I have used Power Automate as an easy to follow example which anyone with access to an environment can play around with. However, for production use (especially in scheduled or unsupervised workflows), error handling and monitoring needs to be added and you should evaluate if Power Automate is the right tool for the job or if another tool like Azure Logic Apps with the more advanced monitoring and logging capabilities should be used instead (the core functionality will be the same, but the scaffolding may be more suited to business-critical processes).
Final thoughts
Using Bulk Messages can save quite a bit of time when you need to import or update a lot of data at once or you expect multiple cycles of Import – Fix Errors – Re-Import. However, API limits still apply and need to be considered and accessing the functions directly via HTTP Message (and not through a paid tool) can lead to some fiddling regarding formatting and error handling.
Have you tried using Bulk Messages to speed up your imports? Let me know how it went in the comments! If you ran into any issues—especially with payload formatting—I’d love to hear about your experience.